Friday, 24 January 2025
Wednesday, 22 January 2025
Friday, 5 November 2021
Mobile wedding Disco 70's and 80's Party DJ suffolk and norfolk
Mobile wedding Disco 70's and 80's Party DJ suffolk and norfolk: Mobile wedding Disco Party DJ Suffolk & Norfolk Mobile Disco, entertainment for Parties, Wedding Receptions etc. Specialising in Wedding Entertainment.
Tuesday, 26 March 2019
Microsoft Outlook – Working With Distribution Lists
Working With Distribution Lists.
A distribution list is a collection of email addresses that you may email of a regular basis, saving you selecting email address individually.The distribution list can contain email addresses from the corporate address book and Outlook contact folders.
You can create as many distribution list as you wish, but when naming the distribution list make sure you give the group a logical name so that you do not select the wrong one when you choose it when creating an email !!!
To Create a new Distribution List
1. Select the File menu → New → Distribution List.

2. Enter a name for the Distribution List.

Click on the Select members to display select the available email addresses from Outlook Address books.

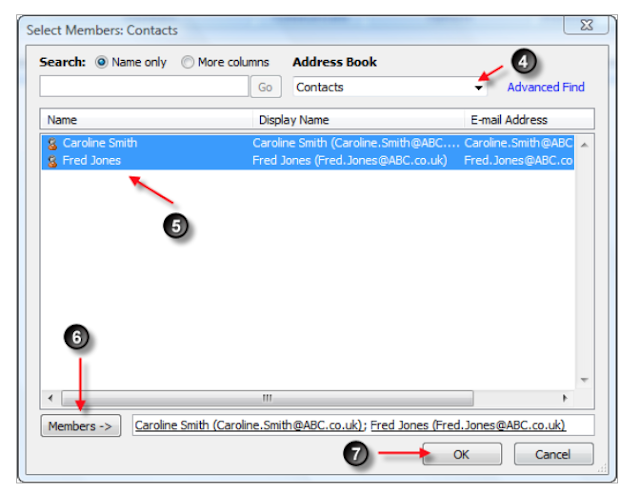
4. Select the address book that contains the email addresses that you wish to include in the distribution list.
5. Highlight the contact names.
6. Click on the Members button to add the address to the Distribution List.
7. Click Ok.
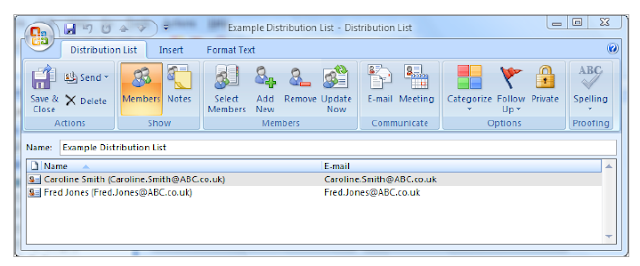
8. Click on Save & Close to save the distribution list into your contacts folder.

Addressing an Email using a Distribution List.
From the contacts folder.Select the New Message to contact icon

From the Inbox.
Address the email in the normal way, by default the Distribution List will be stored in the contacts folder.
Once the Distribution List has been selected the name of the distribution list will be displayed in the message To: bar.
To view the addresses details for the group select the plus sign to the left of the Distribution List name.

Modifying the Distribution List.
It is possible to add or remove members from the Distribution List.To add or remove members, open the distribution list by double clicking on the Distribution List that you wish to modify.
Add New Members: Click on the Select the Select Members icon, and select the addition members, save the Distribution List.

Remove Members: Highlight the members that you wish to remove and select the Remove icon, save and close the Distribution List.

Microsoft Outlook – OneNote
OneNote.
OneNote is a relatively new addition to the Microsoft Office Suite, it is a document management system.OneNote is a great way to store (centralize) all your files together for example you may have to run various projects and you wish to keep all the Word, Excel & Emails stored together for easy access.
OneNote creates a folder, within that file you can create folder for each of your projects, store practically any type of file.
The OneNote folder can be accessed by multiple people if stored on a network.
If the OneNote folder is stored on a network it is possible as well to apply security features to folders that held within the OneNote folder.
OneNote is also very portable, copy the OneNote folder onto an external storage drive and all the documents stored within the OneNote folders are automatically copied as well.
Filing a Outlook Task into OneNote
This is just an overview on how to add an Outlook task into a OneNote folder.Before you can transfer files into OneNote, you will have to firstly open OneNote and create a OneNote folder to store your files.
When you open OneNote it will prompt you through this process.
Open the Task you wish to file into OneNote.
From the Ribbon select Send to OneNote icon.

The Task will now be displayed within the OneNote folder stored in the Unfiled Notes folder.

For storage purposes the filed Task has been saved with the Task’s subject line, “Task Completed: End of term report”.
The task information has been copied onto a new sheet, like a word document.
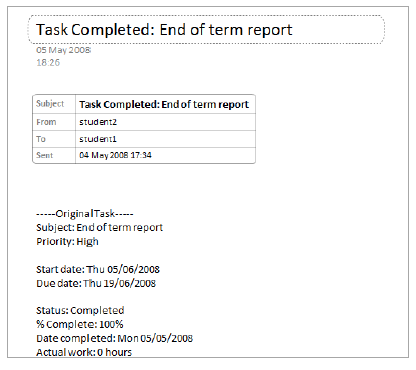
The sheet contains a tab on right hand side. This is so that you can select the document.
The tab will be named the same as the heading in this case “Task Completed: End of term report”.
Moving Documents in OneNote.
In the above example we copied an Outlook Task information into OneNote, the task information was copied onto a new page within OneNote into a folder called Unfiled Notes.The process to move the Task details to a different folder:
Right click on the Page tab
(the tab is located on right hand side of the page).
Click the right mouse button, a short-cut menu will be displayed.
(reverse if mouse has been set for left hand use).
Select Move Page To → Another Section
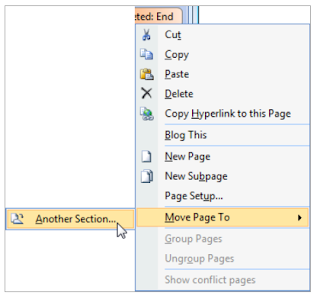
You OneNote will then prompt for the folder you wish to store the file into.
Microsoft Outlook – Journal Explained
Journal Explained
Like the internet history keeps a track on what websites we visit, we can now track what we do on our computer.Have you ever saved a file and forgotten the name and location you save it?
Once configured, the journal can automatically record in a timeline what files you have worked on day-by-day, showing graphically the name file name and icon under the date it was last accessed.

Other applications of the Journal are keeping logs of meeting request, responses etc.
Interaction between the different areas Of Outlook will produce greater efficiency as well as speed up the daily process.
An example of this, you may receive electronically (email message) the agenda for a possible future meeting. This needs to be communicated to various other parties.
No need to phone around each of the people communicated the date and agenda, a few clicks, an appointment invitation sent, which outlook tracks automatically for the responses.
Configuring the Journal.
To activate the Journal, Click on the Journal icon.

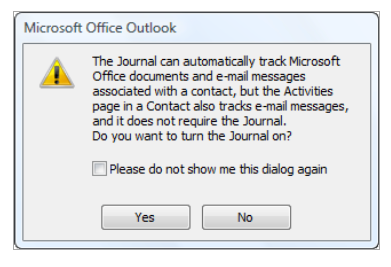
When the Journal is selected for the first time an information box will be displayed.
The information box details the uses of the Journal feature.
To enable the Journal click on the “Yes” button.
Within the Journal Options select the areas of Outlook that you wish to record.
Press the Ok button to confirm changes.
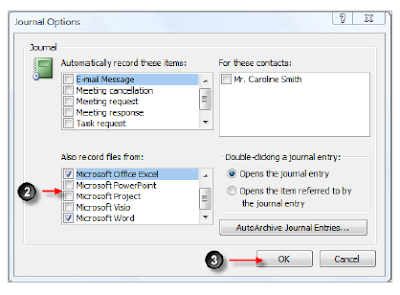
Modifying the Journal Options.
It is possible to modify the Journal options at anytime.
Tools menu →Options →journal options.

The Journal Options dialog box will be displayed.
Make the required modifications and commit the modifications that you wish the Journal to record.
Entering a Manual Journal Entry.
Another useful feature of the Journal is being able to enter a manual entry. For example you may is to keep a record of when you phoned clients
1. From the File menu → New → Journal Entry.
The Untitled Journal Entry dialog box will be displayed.
2. Enter a subject for the Journal entry.
3. Select the Entry Type, in this example “Phone Call”.
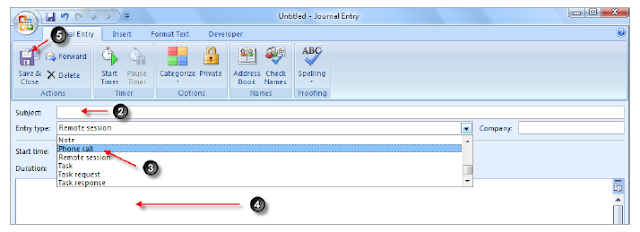
4. Enter any additional details for the Journal entry, for example outcomes of the phone call.
5. Select Save & Close to save the Journal entry.
Microsoft Outlook – What is a Task
What is a Task?
We all like to make lists of things to do, within outlook we can store out lists electronically within Tasks.
Task information can be very detailed, Task Name, Due Date, Date Started).
It is also possible to set Reminders so that we do not forget to do a Task, no more forgetting to send that birthday card….
We can track the progress of our tasks by using the status and percentage completed features.
We can utilize the Task views to help organize our tasks, grouping tasks by category can be very useful when running several projects.
Not only can we enter tasks for ourselves, we can also create a task and send it via email to others to accept, if they accept the task it will be added to their Task list. They are even able to send updates on how far through a task.
Tasks can be viewed in the Task screen, but they can also be viewed within the Calendar screen. In the calendar screen tasks are displayed at the bottom of the calendar screen.
In the daily view for example the tasks will be displayed when the calendar reaches the required task date.
Other features to look out for are the “red flags”, the flags change to a deeper colour of red as the tasks reach their required dates.
Subscribe to:
Comments (Atom)
